Image Preview React Hook
5 min read

Uploading of image files is a common feature among software applications. Since it is so common, a developer must not only know how to select an image from the system's file dialog, he/she must also be able to display a preview of what the app user is trying to upload. In this post, we'll create a simple custom React hook for providing an image preview.
The markup
First, let us render a simple markup.
const ImagePreview = () => {
  return (
    <div style={{ width: '300px' }}>
      <div style={{ aspectRatio: '4 / 3', backgroundColor: 'silver', overflow: 'hidden' }}>
        {/* the <img /> goes here */}
      </div>
      <input type='file' accept='image/*' aria-label='Upload image' />
    </div>
  );
};
Now there's much here. First, we're using HTML5's input with a type as file. We are also constraining the user to only pick images from the system file dialog by providing accept='image/*'. Above the input is a container within which is an img element. We are providing a definite aspect-ratio to the container. Note that using aspect ratio is important to avoid layout shifts. One final thing to note is that the reason why we're just using style to give styles to our markup is that this is just an example component.
The markup is rendered like this:

Adding state and handler
Now let us add the component's state and the change handler
import * as React from 'react';

const ImagePreview = () => {
  const [imageFile, setImageFile] = React.useState<File | null>(null);

  const handleChange: React.ChangeEventHandler<HTMLInputElement> = (e) => {
    const files = e.target.files;
    if (!files || !files.item(0)) return;

    setImageFile(files.item(0));
  };

  return (
    <div style={{ width: '300px' }}>
      <div style={{ aspectRatio: '4 / 3', backgroundColor: 'silver', overflow: 'hidden' }}>
        {imageFile && (
          <img
            src=''
            alt='a sample preview'
            width='100%'
            height='100%'
            style={{ objectFit: 'cover' }}
          />
        )}
      </div>
      <input type='file' accept='image/*' aria-label='Upload image' onChange={handleChange} />
    </div>
  );
};
Our state will hold the image file that the user picks. Initially it is null that's why at line 16, we are conditionally rendering the image component based on whether imageFile is truthy or not. As for the image styles, providing a width and height attribute as 100% assures us that the image will occupy its container. The handleChange function is the function that is called when a change event occurs in the input.
Previewing the image
At this point, we're just setting the imageFile state when a change event occurs but we're not providing any preview to our user. To achieve the desired image preview, we'll utilize the FileReader API and React's useEffect hook.
💡 Info
To learn more about the FileReader API go to this link from MDN.
import * as React from 'react';

const ImagePreview = () => {
  const [imageFile, setImageFile] = React.useState<File | null>(null);

  const [previewSrc, setPreviewSrc] = useState('');

  useEffect(() => {
    if (!imageFile) return;

    const reader = new FileReader();

    reader.onloadend = () => {
      setPreviewSrc(reader.result as string);
    };

    reader.readAsDataURL(imageFile);
  }, [imageFile]);

  // truncated
};
So what's happening here? 😅
First note that we introduced another state previewSrc to store the data url of the image file. Next, look at the useEffect. We instantiate a FileReader and we read the contents of the imageFile using the readAsDataURL method. We then assigned a callback to reader.onloadend. This event is fired when a file read has completed so this is where we set the value for the previewSrc state. The value of the previewSrc state will change as the imageFile is changed because imageFile is in the dependency array of the useEffect.
Now that our previewSrc can now have a value, we can assign it to the image's src like so:
<img
  src={previewSrc}
  alt='a sample preview'
  width='100%'
  height='100%'
  style={{ objectFit: 'cover' }}
/>
💡 Info
Learn more about useEffect from the React
docs.
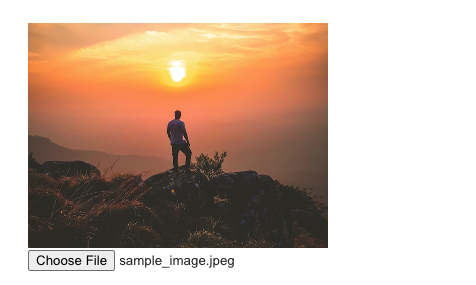
And just like that we can now have a preview of our selected image like the following:
Extracting a useImagePreview hook 🪝
Our solution works but it would be better if we can extract a custom hook out of it. This would be useful when we work on other projects that have image upload and preview functionality. So, let's extract our custom hook into a function called useImagePreview.
export default function useImagePreview(imageFile: File | null) {
  const [previewSrc, setPreviewSrc] = useState('');

  useEffect(() => {
    if (!imageFile) return;

    const reader = new FileReader();

    reader.onloadend = () => {
      setPreviewSrc(reader.result as string);
    };

    reader.readAsDataURL(imageFile);
  }, [imageFile]);

  return previewSrc;
}
We've just copied and pasted our implementation earlier. The only difference is that we're returning previewSrc and we're accepting an imageFile parameter. We use the custom hook as follows:
const previewSrc = useImagePreview(imageFile);One last improvement that we can do is to return a clean up function for the useEffect to avoid memory leaks.
export default function useImagePreview(imageFile: File | null) {
  const [previewSrc, setPreviewSrc] = useState('');

  useEffect(() => {
    if (!imageFile) return;

    const reader = new FileReader();

    reader.onloadend = () => {
      setPreviewSrc(reader.result as string);
    };

    reader.readAsDataURL(imageFile);

    return () => {
      reader.abort();
    };
  }, [imageFile]);

  return previewSrc;
}
Conclusion
By leveraging the FileReader API and React's useState and useEffect hooks, we are able to create a reusable hook that can help us give a preview of the image that our app users select from the file dialog. And, that's it!
Happy coding!
-jep