REST API Using NodeJs And TypeScript
11 min read
NOTE: This is the first part of the series of posts about creating a REST API using Couchbase 7, NodeJS, and TypeScript.
Introduction
NodeJS is a Javascript runtime which allows developers to execute JS code on the server. This opens lots of possibilities. One use-case that NodeJS enables us to create is a REST API. In a nutshell, an API or an Application Programming Interface is a set of rules which define how programs communicate with one another. REST is another acronym which stands for Representational State Transfer. A REST API is an API that conforms to the constraits of REST architecture. When a RESTful API is called by a client, the server transfers a representation of the requested resource. This state representation can be in JSON, XML, or HTML format but for backend applications, JSON is the most popular format for data exchange.
In this post, we'll create a RESTful API using NodeJS and TypeScript.
The Setup
First, create a folder and name it whatever you want. Then, open that folder in your favorite code editor, mine is VS Code. Open a terminal so we can begin installing the needed packages.
- Generate a
package.jsonfile by running:
npm init --y- Install the ff. as dev dependencies:
npm i -D ts-node-dev typescript @types/node- Generate a
tsconfig.jsonfile by running the ff.:
tsc --initThe tsconfig.json file has different compiler options that TypeScript uses when compiling TS-based projects.
- Add the ff. script in your package.json file then create a
main.tsfile:
 "scripts": {
    "start": "ts-node-dev --respawn --pretty --transpile-only main.ts"
  },
The script runs our entry point (main.ts) then watch for changes and then restarts the process once changes in our files occur.
- Initiate git and add a
.gitignorefile:
git initIn the .gitignore file:
/node_modulesMake sure that you do this to avoid accidentally pushing node_modules into your repository.
Now, write a simple code like console.log('Hello Node!') inside main.ts then run npm start. The process should start and your code should work.
Basic Express App
We'll use Express to create our API. Express is, as it says in its website, is a fast, unopinionated, minimalist web framework for Node.js. A basic Express app looks like the following:
import express from 'express';

// app setup
const PORT = 3001;
const app = express();

// Middlewares
app.use(express.json());
app.use(express.urlencoded({ extended: true }));

// health check route
app.get('/health-check', async (req, res, next) => {
  res.status(200).send('The API service works fine!');
});

// server
app.listen(PORT, () => {
  console.log(`API Server running on port ${PORT}`);
});

// log unhandled rejections
process.on('unhandledRejection', (err) => {
  console.log(err);
});
When we run the start script, a message like the ff. should appear in our terminal:
API Server running at port 3001In our bare minimun app, we created a /health-check route. Hitting the correct route or endpoint makes us reach a specific resource. When we hit that test route, a GET request is processed and the request handler returns a message to us with a HTTP Status code of 200 which means success. You can test it in any browser or by using an API client like Postman.
Overview of HTTP Verbs and HTTP Status Codes
GET is called an HTTP verb for RESTful services. The primary HTTP verbs are the ff.:
- GET - fetch a resource
- POST - create a new resource
- PUT - updates an entire resource
- PATCH - updates a part of a resource
- DELETE - deletes a resource
These correspond to CRUD (Create, Read, Update, Delete) operations that we normally see in software applications.
HTTP response status codes are codes which indicate the type of response an API service sent to the requesting client. These are grouped into five classes:
- Informational responses (100–199)
- Successful responses (200–299)
- Redirection messages (300–399)
- Client error responses (400–499)
- Server error responses (500–599)
But the most commonly used are:
- 200 - success
- 201 - a new resource has been successfully created
- 204 - empty response (normally for DELETE requests)
- 400 - a bad request from the client
- 401 - unauthorized
- 403 - forbidden
- 404 - not found
- 500 - internal server error
💡 Info
To learn more about HTTP verbs and status codes, go to this link from MDN.
Basic CRUD operations
For this contrived example, we'll simply use an in-memory data, that is, a simple array of objects. In your working directory, create the ff. folders and files:
- models folder;
- controllers folder;
- routes folder;
Inside each of those folders, create a file called user.ts. Your files should now look like the ff.:

Now, inside models/user.ts, add the following code:
// models/user.ts

interface User {
  id: string;
  name: string;
  email: string;
  role: 'admin' | 'customer' | 'vendor';
}

// Dummy Data
let userData: User[] = [
  { id: 'USER::1', name: 'Jeff Segovia', email: 'jeff@email.com', role: 'admin' },
  { id: 'USER::2', name: 'John Wick', email: 'john@email.com', role: 'admin' },
  { id: 'USER::3', name: 'Peter Parker', email: 'peter@email.com', role: 'customer' },
  { id: 'USER::4', name: 'Sherlock Holmes', email: 'sherlock@email.com', role: 'vendor' },
];
We simply created an interface which defines the shape of the User entity and we created an array of users that will serve as our application data.
GET Requests
Let's start with GET requests.
To fetch all users, simply return the array of users:
// models/user.ts

// GET
const getAll = () => {
  return userData;
};

const UserModel = {
  getAll,
};

export default UserModel;
To find a user by its ID, we simply use Array.find:
// models/user.ts

// GET
const getAll = () => {
  return userData;
};

// GET by ID
const getById = (id: string) => {
  const foundUser = userData.find((u) => u.id === id);
  return foundUser;
};

const UserModel = {
  getAll,
  getById,
};

export default UserModel;
Now, let us add the request handlers in the controller file. Inside controllers/user.ts, add the ff. code:
// controllers/user.ts

import { RequestHandler } from 'express';

import UserModel from '../models/user';

const getAll: RequestHandler = async (req, res, next) => {
  try {
    const users = await UserModel.getAll();

    res.status(200).json(users);
  } catch (err) {
    next(err);
  }
};

const findbyId: RequestHandler = async (req, res, next) => {
  try {
    const user = await UserModel.getById(req.params.id);

    res.status(200).json(user);
  } catch (err) {
    next(err);
  }
};

const userController = {
  getAll,
  findbyId,
};

export default userController;
Note that the async/await syntax in our controller methods are not really necessary for this example but I've included it anyway because in API services, Promises are normally involved.
Now, let's define the routes for our GET requests. Inside routes/user.ts, write the ff. code:
// routes/user.ts

import { Router } from 'express';
import userController from '../controllers/user';

const userRouter = Router();

userRouter.route('/').get(userController.getAll);

userRouter.route('/:id').get(userController.findbyId);

export default userRouter;
In that code, we simply initialized a router object by invoking Router. Then in our routes, we tell Express that when a specific route is hit, the request should be handled by the assigned controller method. In this case, / will be handled by userController.getAll and /:id by userController.findbyId.
Then in our main.ts file, we register our userRouter as a middleware. A middleware is a function that has an access to the request-response cycle.
import express from 'express';
import userRouter from './routes/user';

// app setup
const PORT = 3001;
const app = express();

// Middlewares
app.use(express.json());
app.use(express.urlencoded({ extended: true }));

// health check route
app.get('/health-check', async (req, res, next) => {
  res.status(200).send('The API service works fine!');
});

// routes
app.use('/users', userRouter);

// server
app.listen(PORT, () => {
  console.log(`API Server running at port ${PORT}`);
});

// log unhandled rejections
process.on('unhandledRejection', (err) => {
  console.log(err);
  // process.exit(1);
});
Note the code in line 18. That line of code means that every request on the users endpoint will be handled by the userRouter.
Now, let's test it. For this, I'll use Postman:
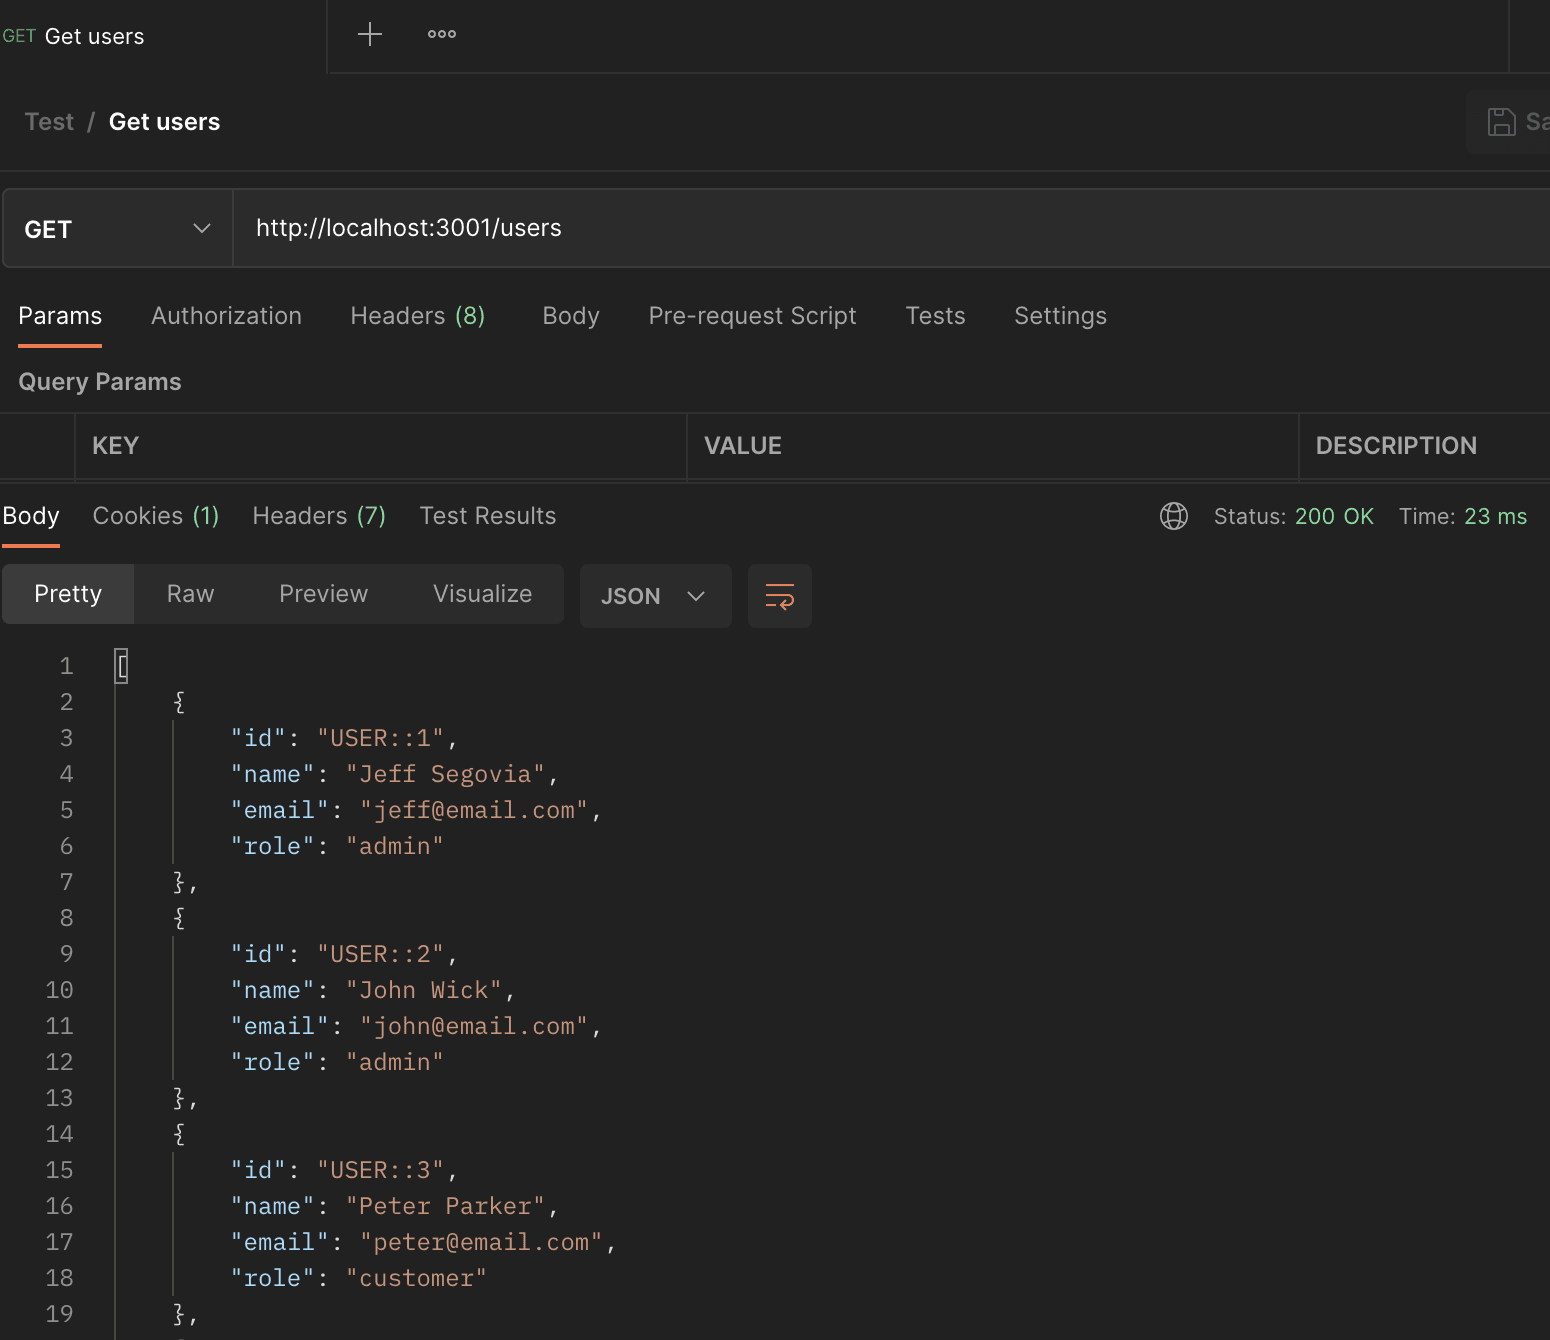
Getting a user by ID:

POST and PATCH Requests
Now, let us add the code for handling POST and PATCH requests. Let's start by adding a create method in our model.
// models/user.ts

// ...other code

// CREATE
const create = (user: Omit<User, 'id'>) => {
  const id = Date.now().toString();

  const newUser = { id, ...user };

  userData.push(newUser);

  return newUser;
};

const UserModel = {
  getAll,
  getById,
  create,
};

export default UserModel;
Since we're just working with an in-memory data, creating a new User object is simply pushing a new item to the array. Note that we generated a unique ID by simply using Date.now().toString().
Now, let us add a controller method for create:
// controllers/user.ts

import { RequestHandler } from 'express';

import UserModel from '../models/user';

const getAll: RequestHandler = async (req, res, next) => {
  try {
    const users = await UserModel.getAll();

    res.status(200).json(users);
  } catch (err) {
    next(err);
  }
};

const findbyId: RequestHandler = async (req, res, next) => {
  try {
    const user = await UserModel.getById(req.params.id);

    res.status(200).json(user);
  } catch (err) {
    next(err);
  }
};

const create: RequestHandler = async (req, res, next) => {
  try {
    const user = await UserModel.create(req.body);

    res.status(201).json(user);
  } catch (err) {
    next(err);
  }
};

const userController = {
  getAll,
  findbyId,
  create,
};

export default userController;
Then add a POST route:
import { Router } from 'express';
import userController from '../controllers/user';

const userRouter = Router();

userRouter.route('/').get(userController.getAll).post(userController.create);

userRouter.route('/:id').get(userController.findbyId);

export default userRouter;
To test the POST endpoint in Postman, add a JSON body in the request:
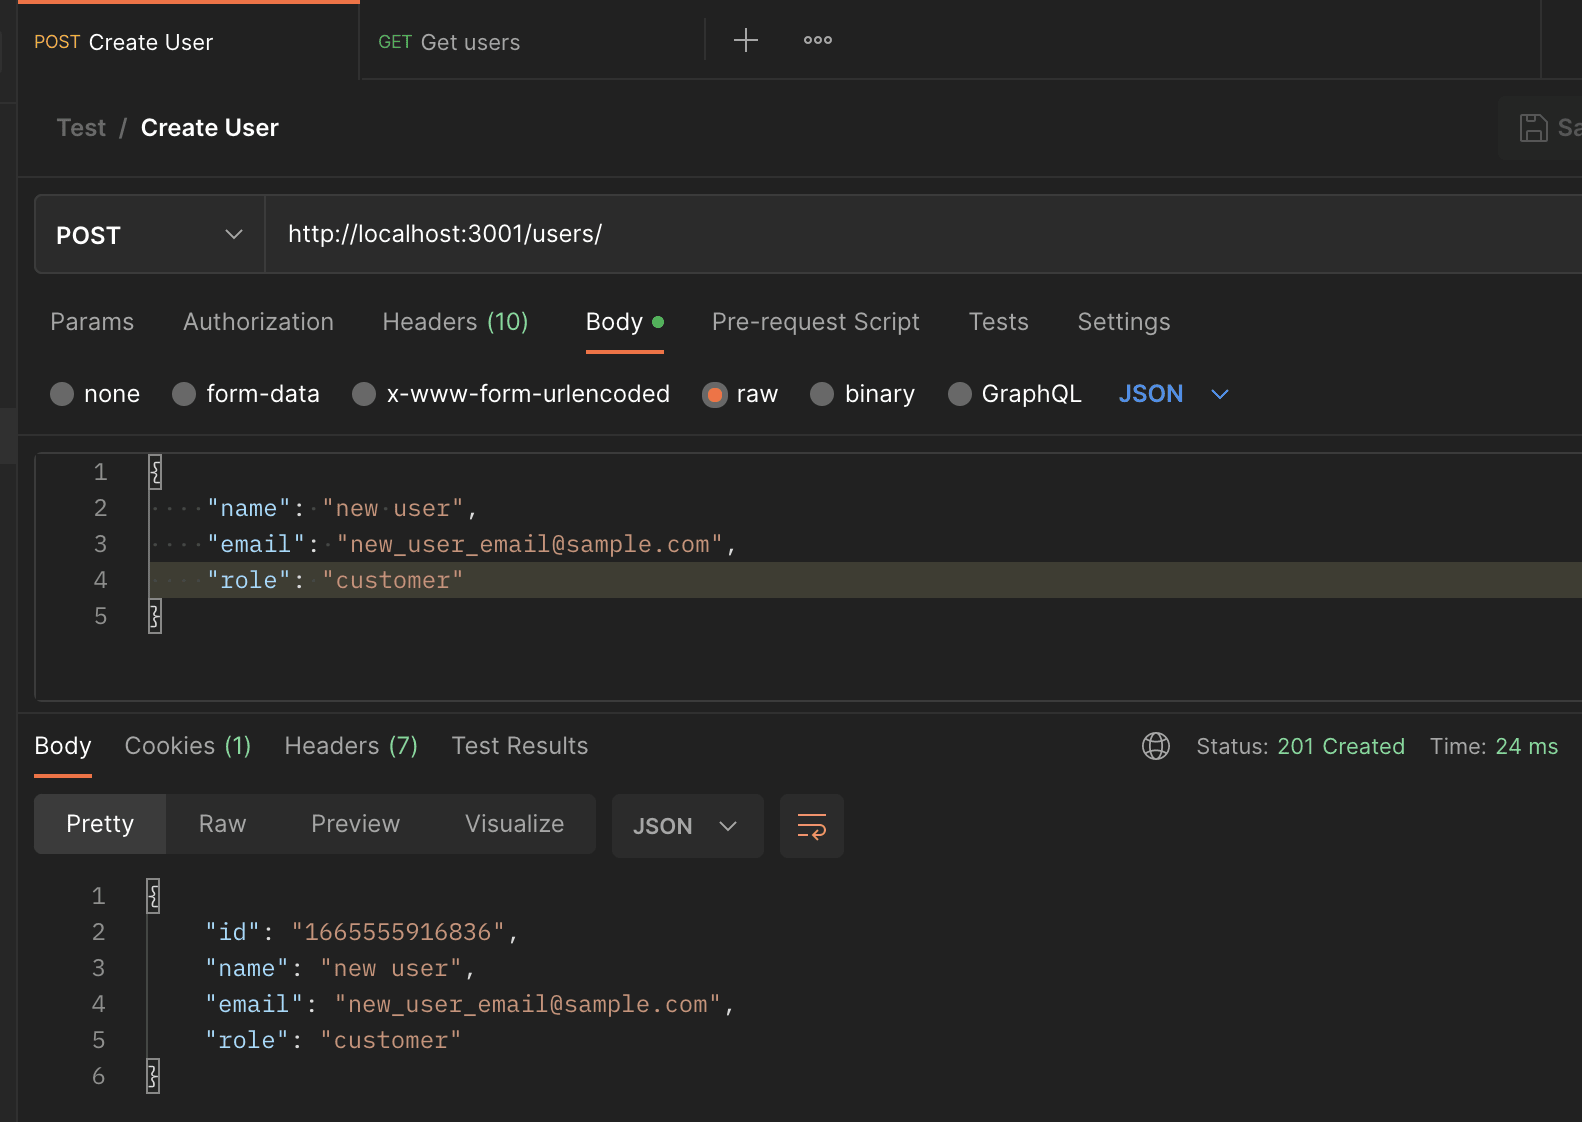
Hitting this endpoint will return the newly created user. Note the HTTP status code which is 201 which means that a new resource (user) has been created successfully.
Let's now add the code for update.
In our model:
// models/user.ts

// ...other code

// UPDATE
const update = (id: string, user: Partial<User>) => {
  // Note: there are other ways to do this!
  const indexOfUserToUpdate = userData.findIndex((u) => u.id === id);
  const userToUpdate = userData[indexOfUserToUpdate];
  userData.splice(indexOfUserToUpdate, 1, { ...userToUpdate, ...user });

  return userData[indexOfUserToUpdate];
};

const UserModel = {
  getAll,
  getById,
  create,
  update,
};

export default UserModel;
In the controller:
// controllers/user.ts

import { RequestHandler } from 'express';

import UserModel from '../models/user';

// ...other code

const update: RequestHandler = async (req, res, next) => {
  try {
    const user = await UserModel.update(req.params.id, req.body);

    res.status(200).json(user);
  } catch (err) {
    next(err);
  }
};

const userController = {
  getAll,
  findbyId,
  create,
  update,
};

export default userController;
In the route:
import { Router } from 'express';
import userController from '../controllers/user';

const userRouter = Router();

userRouter.route('/').get(userController.getAll).post(userController.create);

userRouter.route('/:id').get(userController.findbyId).patch(userController.update);

export default userRouter;
To test the update route, simply put an object with any property of the user that you wish to update.

DELETE Request
Lastly, let's add the DELETE functionality. First, add the remove method in our model.
// models/user.ts

// ...other code

// DELETE
const remove = (id: string) => {
  const indexOfUserToDelete = userData.findIndex((u) => u.id === id);

  userData.splice(indexOfUserToDelete, 1);

  return id;
};

const UserModel = {
  getAll,
  getById,
  create,
  update,
  remove,
};

export default UserModel;
In the controller:
// controllers/user.ts

import { RequestHandler } from 'express';

import UserModel from '../models/user';

// other code ...

const remove: RequestHandler = async (req, res, next) => {
  try {
    await UserModel.remove(req.params.id);

    res.sendStatus(204);
  } catch (err) {
    next(err);
  }
};

const userController = {
  getAll,
  findbyId,
  create,
  update,
  remove,
};

export default userController;
In the route:
import { Router } from 'express';
import userController from '../controllers/user';

const userRouter = Router();

userRouter.route('/').get(userController.getAll).post(userController.create);

userRouter
  .route('/:id')
  .get(userController.findbyId)
  .patch(userController.update)
  .delete(userController.remove);

export default userRouter;
Hitting the DELETE endpoint will delete the user with an id that is the same as the URL param :id. Its response is an empty response indicated by a 204 status code.

And that's it!
Where to go from here?
The CRUD functionality of this REST API works fine. However, there are still rooms for improvements. One thing we can do is to add validation for checking if a resource exists, for checking if the request body conforms to the shape of the data that we expect. Another thing is to persist the data by using a database such as MySQL, MongoDB, or Couchbase.
Check out Part 2 of this post: